
THE SCOTT PROJECT: Renovating a Home in Stages
When you're renovating your entire home it can be a bit overwhelming. If you’re like us and doing it all at once isn’t in the budget, it's helpful to lay out the project in stages.
The key to doing a renovation in stages is all in the planning. Before you start anything, plan out your entire project- a "wish list" of everything you would like tackle. Even if you aren’t able to do something right away, it’s important to know what you’re going to do down the road so that all your design decisions align.
Discuss the Budget
After you've created your "wish list," it's a good time to sit down and put a budget together. There are several ways to go about budgeting for a renovation in stages, but having a plan will help you stay in a comfortable range so that you can complete everything you are wanting to do instead of running out of money after the first phase. You can do some research and set budgetary numbers by category, room or phase to help keep you in check.
Refine Your Vision
Now it's time to create a vision for your home. Pinterest is a great place to start- grab a cup of coffee and take some time to scroll and pin images you love. We also love using Instagram for inspiration. After doing this for awhile, you will start to see common themes (white oak kitchen cabinets, modern black hardware, etc.) which will help you define your style.
Don’t rush into anything until you have a clear vision. In buying this house I’ve learned that I have a much harder time designing for myself than I do for other people. I have struggled with a clear vision- designing and redesigning several times! I had to take a step back and create a focused vision after months of making quick, on-the-spot decisions.
When creating your vision you also have to keep in mind the style of your home. Unless you are planning on completely gutting the whole house and starting over, you will have to work with the current style in some ways. For example we have a very traditional home, which isn't my go-to style, but a lot of those traditional elements, like the millwork, will have to stay. As I am looking for inspiration images, I am keeping those elements in mind so I can find ways to integrate them into my own personal style.
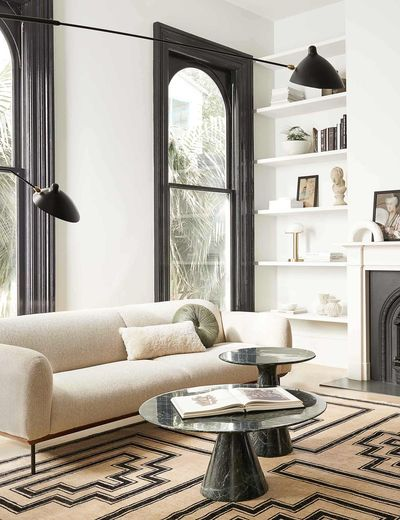
This was an image I found with traditional trim painted black. Since our trim is similar to this, I knew it would translate well.
Create a Mood Board
Once you’ve gathered all your images, put them together on a mood board. This will symbolize the overall look and feel of your home. If it’s too overwhelming to plan out your entire renovation at once, you can at least have your mood board to reference as you are making decisions later on. Having some cohesion is important, this mood board will keep you on track.

This is the mood board I created for my home. As you can see there is a lot of black and white. I am usually drawn to warmer, low contrast design but a cost efficient way to modernize traditional millwork is to paint it black or white. Since there is quite a bit of trim, my decision to do a combination of the two is what set the mood for the entire design. To soften the starkness of the black and white paint, we chose to brighten up the dark wood floors to a more natural tone and bring in warmer accent colors.
Phase Out Your Project
After you’ve created your mood board, break it down room by room or by category. Some updates, such as flooring, make more sense to do all at once rather than room by room. We started our project by refinishing the existing hardwoods and replacing carpet with new hardwood in all the main living areas. We also painted and switched out all the lighting in these rooms, which can be a great budget friendly update with a big impact.


Excuse the poor quality photos-I had no intention of blogging about this project at the time these were taken!
These rooms still have a ways to go but you can already see the difference these small updates made. This gives us a great starting point so that we can now move to more of a "room by room" approach.
As we work through the house, we will take you along and show you how we tackle each room. First up, the living room!
Missed all the before pictures? See them here.